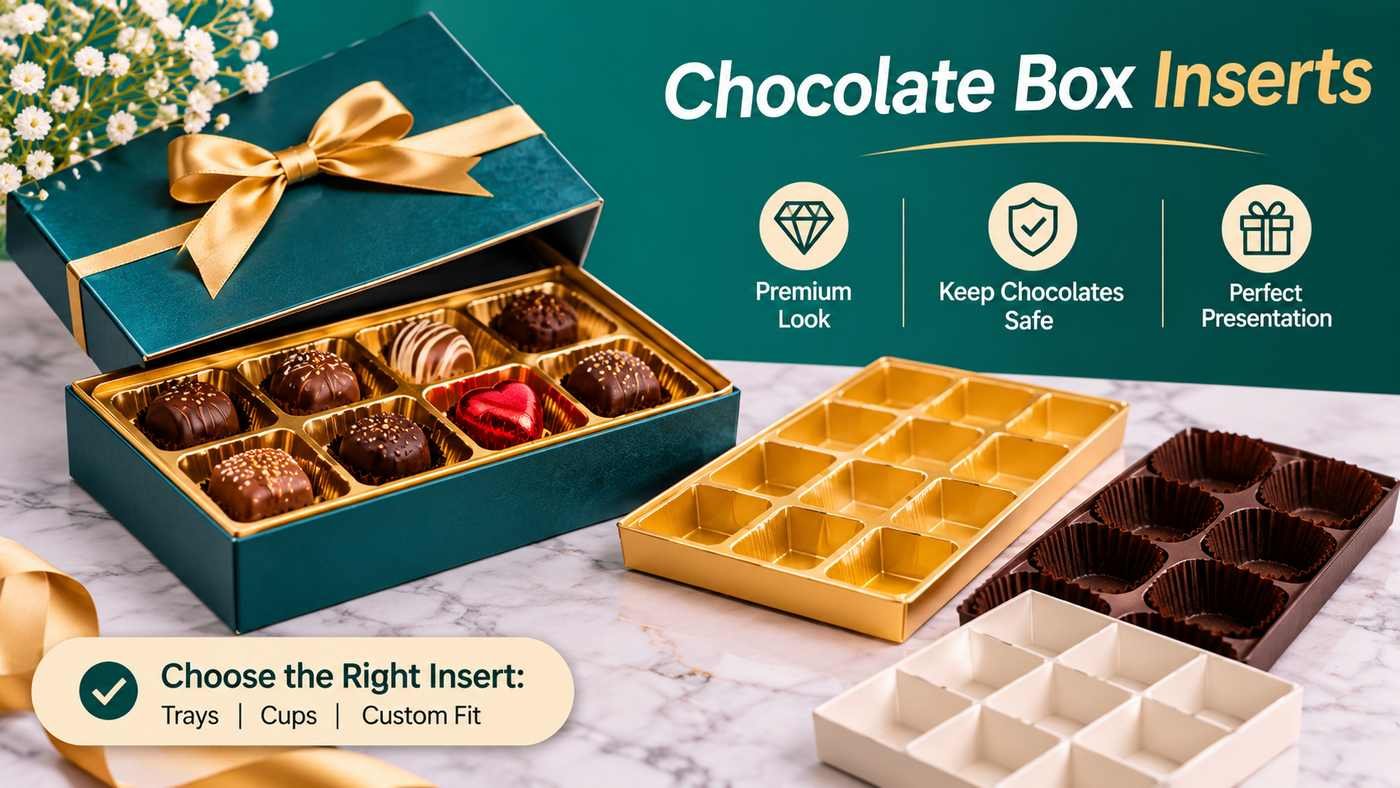
A chocolate box should do more than hold a collection of sweets. Its insert keeps individual pieces organized, helps prevent movement, and presents each chocolate neatly when the customer opens the package. Choosing the right insert depends on the shape, size, weight, finish, and number of chocolates in the assortment. This chocolate box inserts guide explains the main insert styles, material considerations, sizing steps, and practical checks for retail, gifting, and shipping.
There is no single insert design for every chocolate assortment. A box of uniform truffles has different requirements from a mixed collection of pralines, bars, clusters, and delicate molded pieces. Start with the chocolates themselves, then choose an insert that supports both protection and presentation.
Choose chocolate inserts by matching each cavity to the chocolate’s dimensions and shape, allowing enough clearance for easy placement and removal, and checking that the insert stays stable inside the outer box. Confirm food-contact suitability for the exact insert material and test the complete pack with real chocolates before ordering in bulk.
Why chocolate box inserts matter
Chocolate pieces can have delicate coatings, decorative tops, fillings, and shapes that are easily marked when products move against one another. An insert creates individual spaces and helps maintain an orderly arrangement.
- Separation: Individual cavities help keep pieces from rubbing against neighboring chocolates.
- Positioning: A well-fitted insert helps limit movement inside the outer box.
- Presentation: Consistent spacing creates a neat assortment when the lid is opened.
- Organization: Inserts can arrange flavors, shapes, or rows in a planned sequence.
- Handling: Suitable cavity shapes can make it easier to place and remove chocolates without touching delicate decorations.
- Brand experience: The insert and outer box work together to create a coordinated gift or retail presentation.
An insert is only one part of the packaging system. The outer box, closure, cushioning, storage conditions, and shipping carton also influence how well the chocolates arrive.
Common types of chocolate box inserts
Insert designs vary by material, cavity shape, and the way they fit inside the outer box. The following options are common starting points; availability and performance depend on the supplier’s construction and food-contact specifications.
1. Individual cavity inserts
Individual cavity inserts provide a separate compartment for each chocolate. Cavities may be round, square, rectangular, oval, or custom-shaped to suit the assortment.
Consider this style when:
- Your assortment contains several pieces that should remain separated.
- Chocolates have delicate coatings or decorative details.
- You want a consistent grid or planned arrangement.
- Different pieces need different cavity dimensions.
Check the cavity depth and opening carefully. A cavity that is too shallow may not hold the piece securely, while one that is too tight can make removal difficult or damage the chocolate.
2. Tray-style inserts
A tray insert forms a supporting layer inside the box. It may include individual wells, a larger open area, or a combination of compartments. Tray formats can be designed to lift out as one piece, depending on the construction.
Consider this style when: you need an organized presentation that can be placed into the outer carton as a single component. Confirm that the tray does not flex excessively under the weight of the chocolates and remains correctly positioned when the box is carried.
3. Paperboard inserts
Paperboard inserts can be cut, creased, folded, or assembled into dividers and compartments. They can be coordinated with the outer packaging and may suit brands that want a paper-based presentation.
Potential advantages:
- Can be designed around a specific box layout and assortment.
- Can provide dividers or shaped supports without a separate molded tray.
- Can coordinate visually with printed paperboard packaging.
- May be supplied flat or in a form that is assembled before packing, depending on design.
Points to check: Confirm the insert’s stiffness, edge finish, assembly method, and suitability for the intended food-contact use. A paperboard divider is not automatically a direct-food-contact material.
4. Molded pulp or formed-fiber inserts
Formed-fiber inserts are shaped into cavities or supporting forms. Depending on the design, they can hold pieces in defined positions and create a distinctive natural-fiber appearance.
Potential advantages:
- Can be molded to create multiple cavities or shaped supports.
- Can be developed for a specific assortment and box footprint.
- May suit packaging concepts that favor a fiber-based look.
Points to check: Review surface smoothness, cavity dimensions, fiber shedding, cleanliness, moisture sensitivity, and documentation for the intended food-contact application. Confirm that the material will not mark delicate chocolate surfaces.
5. Plastic or thermoformed inserts
Thermoformed inserts use a shaped plastic sheet to create defined wells. The cavities can be designed to hold individual chocolates and may be covered with a suitable film or placed inside a paperboard outer box, depending on the packaging system.
Potential advantages:
- Can create consistent, repeatable cavity shapes.
- Can be designed for pieces with specific dimensions.
- May provide a smooth surface that supports neat placement and removal.
Points to check: Confirm the exact plastic type, food-contact suitability, thickness, cavity fit, and compatibility with the intended storage conditions. Consider local recycling availability and the complete package rather than assuming a plastic insert is recyclable everywhere.
Chocolate insert comparison table
This overview is a design aid, not a universal performance ranking. The finished insert’s performance depends on its material grade, thickness, geometry, manufacturing quality, and use.
How to choose inserts for different chocolate assortments
The assortment should determine the cavity layout. Count the pieces, measure the largest and smallest items, and identify any shapes that need extra support.
Truffle assortments
Truffles are often rounded and may have coatings such as cocoa, nuts, or decorative finishes. Individual rounded wells can help keep them separated. Check the cavity diameter and depth against the widest part of each truffle, including any coating or decoration.
Pralines and filled chocolates
Pralines can have varied shapes, shells, and decorative tops. A custom cavity layout may be useful when pieces differ in height or width. Make sure the insert supports the base without pressing against delicate tops or edges.
Chocolate squares and mini bars
Rectangular or square compartments can help organize uniform pieces into rows. Check the internal dimensions and allow practical clearance so staff can load and remove the pieces without scraping their edges.
Mixed chocolate collections
A mixed assortment may combine round, square, and irregular pieces. Consider a layout with more than one cavity shape or a divided tray. Arrange the pieces so taller chocolates do not press against neighboring decorations or the inside of the lid.
Chocolate clusters and bark pieces
Clusters and broken or irregular bark pieces may not fit neatly into a tight grid. Larger compartments or flexible dividers may be more practical. Test whether pieces shift, overlap, or catch on the insert when the box is moved.
Measure chocolates and calculate the insert layout
Accurate measurements help avoid inserts that are too tight, too loose, or incompatible with the outer carton. Use the finished chocolate, including toppings and decorations, when measuring.
- Measure each shape: Record the maximum width, length, and height of every chocolate type.
- Group similar pieces: Identify which chocolates can share a cavity size and which need a dedicated shape.
- Count the assortment: Confirm the number of pieces and the intended row or grid arrangement.
- Allow practical clearance: Provide enough room for placement and removal without allowing excessive movement.
- Check cavity depth: Support the chocolate without pressing on decorative tops or forcing pieces into the insert.
- Measure the outer box: Confirm the insert’s overall footprint and height fit inside the carton with the lid closed.
- Check headroom: Leave enough space between the top of the chocolate and the lid so the package does not crush the assortment.
Do not rely only on nominal chocolate dimensions. Hand-finished or coated pieces may vary slightly, so test several examples from a real production batch.
Design considerations for a premium chocolate presentation
In gift and retail packaging, the insert is visible as soon as the customer opens the box. Its layout, color, finish, and fit should complement the chocolates and the outer packaging.
- Consistent spacing: Align cavities to create an orderly arrangement.
- Color coordination: Coordinate the insert with the box interior, exterior, and brand palette.
- Easy access: Consider finger clearance or a practical way to lift individual pieces.
- Protective headroom: Prevent the lid from touching toppings or decorations.
- Assortment sequence: Arrange flavors and shapes intentionally, especially when the box includes a product guide.
- Clean finish: Check edges, seams, dust, and visible manufacturing marks.
For a gift assortment, the unboxing experience matters. The insert should make the chocolates look intentional and easy to identify, rather than crowded or randomly placed.
Food-contact suitability and storage considerations
Not every insert material, coating, adhesive, or printed surface is suitable for direct contact with chocolate. Chocolate can be sensitive to heat, moisture, odor, and surface contamination, so confirm the complete insert specification with the supplier.
- Request documentation for the exact material and any coating or barrier.
- Confirm whether the insert is intended for direct food contact or requires a separate food-safe liner or wrapper.
- Check that inks, adhesives, and finishes are appropriate for their position and intended use.
- Evaluate odor transfer and surface cleanliness with the actual product.
- Store finished packaging in a clean, dry environment according to supplier guidance.
- Consider the temperature and humidity conditions in storage, retail display, and delivery.
Follow applicable food-contact rules in the market where the chocolates will be sold. A general description such as “food grade” should be supported by documentation relevant to the exact finished packaging and use conditions.
Test the insert before placing a wholesale order
A sample test can reveal issues that drawings and measurements alone may not show. Use real chocolates and the intended outer box when evaluating the insert.
- Does every chocolate fit its cavity without force?
- Can pieces be removed without scraping or damaging coatings?
- Does the insert prevent pieces from shifting during ordinary handling?
- Is there enough headroom under the closed lid?
- Does the insert sit securely inside the outer box?
- Are the surfaces clean, smooth, and free from unwanted odor or loose fibers?
- Is the material documented for its intended food-contact use?
- Does the arrangement look balanced when the box is opened?
- Can staff load the assortment efficiently and consistently?
Repeat the test with a full assortment and after realistic handling or delivery conditions. Approve the insert only after checking both product protection and presentation.
Custom chocolate boxes with inserts
Custom chocolate boxes can be planned around the assortment, outer box dimensions, insert layout, and brand presentation. When discussing a project, provide the number of pieces, chocolate measurements, shapes, and any special handling requirements.
Printed chocolate boxes can carry your logo, brand colors, product details, and gift messaging. Make sure the insert and printed box work together visually, and confirm that artwork does not interfere with folds, closures, or the inside fit.
When comparing wholesale chocolate boxes, review insert material, cavity tooling or setup requirements, sample availability, minimum order quantities, lead times, and shipping. Branded chocolate boxes should be assessed as a complete package, including the insert, outer carton, and any protective wrap.
Chocolate makers sourcing custom chocolate boxes in the USA should confirm that all materials and components meet applicable requirements for the intended food-contact use. Share the assortment specifications and request a physical sample before approving production.
Frequently asked questions
What is the purpose of an insert in a chocolate box?
An insert separates and positions individual chocolates, helps limit movement, and creates an organized presentation. The right design depends on the assortment’s shapes, sizes, and packaging requirements.
Which insert is best for assorted chocolates?
Individual cavity trays or custom layouts with different cavity shapes may work well for mixed assortments. Choose based on the actual chocolate dimensions and test removal, stability, and presentation.
Are paperboard inserts suitable for chocolate boxes?
They can be suitable for some designs, including dividers and formed compartments. Confirm the exact paperboard grade, construction, surface finish, and food-contact suitability for the intended use.
How do I measure chocolates for a custom insert?
Measure the maximum length, width, and height of finished chocolates, including toppings and decorations. Then test cavity clearance, depth, spacing, and the insert’s fit inside the outer box.
Do chocolate box inserts need to be food safe?
Materials that directly contact food must be suitable for that use and comply with applicable requirements. If the insert is not intended for direct contact, discuss an appropriate food-safe wrapper or liner with your supplier.
Should I test a chocolate insert before ordering wholesale?
Yes. Test a complete sample with real chocolates to check fit, movement, removal, headroom, surface finish, and presentation before placing a bulk order.
Plan a chocolate box around your assortment
Explore custom chocolate packaging options and prepare an insert layout that fits your chocolates, protects their presentation, and supports your brand. Share your piece count, shapes, and dimensions to get started.